Unlocking the Power of IoT Remote Access
Hey there, tech enthusiasts! Let’s talk about something that’s transforming the way we interact with our devices: IoT remote access. In today’s world, the Internet of Things (IoT) isn’t just a fancy buzzword anymore—it’s a reality that’s shaping the way we live and work. Imagine being able to control your smart home devices, monitor industrial equipment, or manage your Raspberry Pi projects from anywhere in the world. Sounds cool, right?
With the growing popularity of IoT remote access on Windows 10, more and more people are jumping into this tech trend. But what exactly does IoT remote access mean? Simply put, it allows you to control and interact with IoT devices from virtually anywhere using your Windows 10 device. Whether you're on a desktop PC, tablet, or phone, you can stay connected to your devices without being physically present.
Why IoT Remote Access Matters
IoT remote access offers users the ability to control and monitor devices from virtually anywhere, enhancing productivity and convenience. Picture this: you’re at work, and you suddenly remember you left the lights on at home. With IoT remote access, you can turn them off with just a few taps on your phone. Or maybe you’re a developer working on a project and need to troubleshoot your Raspberry Pi from a remote location. IoT remote access makes all of this possible.
Read also:King Von Confirmed Kills The Untold Story Behind The Numbers
But here’s the thing: setting up IoT remote access doesn’t have to break the bank. With the right tools and knowledge, you can achieve this functionality for free on Windows 10 without compromising on performance or security. In this article, we’ll walk you through everything you need to know to set up IoT remote access without spending a dime.
Getting Started: What You Need to Know
Before we dive into the nitty-gritty, let’s break down the basics. To get started with IoT remote access, you’ll need a few things:
- A Windows 10 device (desktop, laptop, tablet, or phone).
- An IoT device, such as a Raspberry Pi or any other compatible device.
- A stable internet connection (both for your IoT device and your controlling device).
- Basic knowledge of networking and remote access tools like SSH (Secure Shell).
Once you’ve set up your IoT device and enabled remote access, you can use Windows 10 to remotely access and control your devices. It’s like having a virtual assistant for all your tech needs.
Step-by-Step Guide to Setting Up IoT Remote Access
Method 1: Using IoT Edge GUI
One of the easiest ways to manage your IoT devices is by using the IoT Edge GUI. This graphical user interface (GUI) simplifies the process of setting up and managing your IoT devices. Here’s how you can get started:
- Download and install the IoT Edge GUI software on your Windows 10 device.
- Connect your IoT device to the same network as your controlling device.
- Launch the IoT Edge GUI and follow the on-screen instructions to configure your device.
- Once set up, you can monitor and control your IoT device from anywhere using the GUI.
This method is perfect for beginners who prefer a more user-friendly approach to managing their IoT devices.
Method 2: Setting Up SSH Access
If you’re comfortable with the command line, SSH (Secure Shell) is a powerful tool for remotely accessing your IoT devices. Here’s how you can set it up:
Read also:Christoph Waltz First Wife Unveiling The Story Behind The Iconic Actors First Marriage
- Install an SSH client on your Windows 10 device. PuTTY is a popular choice, but you can also use the built-in SSH client in Windows 10.
- Enable SSH on your IoT device. For example, if you’re using a Raspberry Pi, you can enable SSH through the Raspberry Pi Configuration tool.
- Connect to your IoT device using the SSH client. Enter the IP address of your IoT device and your login credentials when prompted.
- Once connected, you can run commands, transfer files, and manage your IoT device remotely.
SSH provides a secure and efficient way to access your IoT devices, making it a favorite among developers and tech enthusiasts.
Troubleshooting Common Issues
Setting up IoT remote access isn’t always smooth sailing. Here are a few common issues you might encounter and how to fix them:
- Connection Problems: If you’re having trouble connecting to your IoT device, double-check the IP address and ensure both devices are on the same network.
- Port Conflicts: If you’re using SSH, make sure no other services are using port 22 (the default SSH port). You can check this in your router settings or by visiting the SocketXP web portal.
- Authentication Errors: If you’re getting authentication errors, verify your login credentials and ensure SSH is properly enabled on your IoT device.
By addressing these issues early on, you can ensure a smoother setup process and avoid frustration down the line.
Advanced Tips for IoT Remote Access
Using SocketXP for Remote IoT Access
SocketXP is a powerful IoT remote access solution that allows you to access your IoT desktop remotely from anywhere using just a desktop or laptop computer. Here’s why you should consider using SocketXP:
- User-Friendly Interface: Say goodbye to the command line and enjoy a familiar desktop environment on your IoT device.
- Secure Connections: SocketXP ensures your connections are secure, protecting your devices from unauthorized access.
- Cloud Integration: Set up cloud alerts and run batch jobs on your IoT devices with ease.
By leveraging SocketXP, you can take your IoT remote access experience to the next level.
Controlling Your Raspberry Pi from Anywhere
If you’re a Raspberry Pi enthusiast, you’ll be happy to know that you can control your Pi from anywhere using IoT remote access. Here’s how:
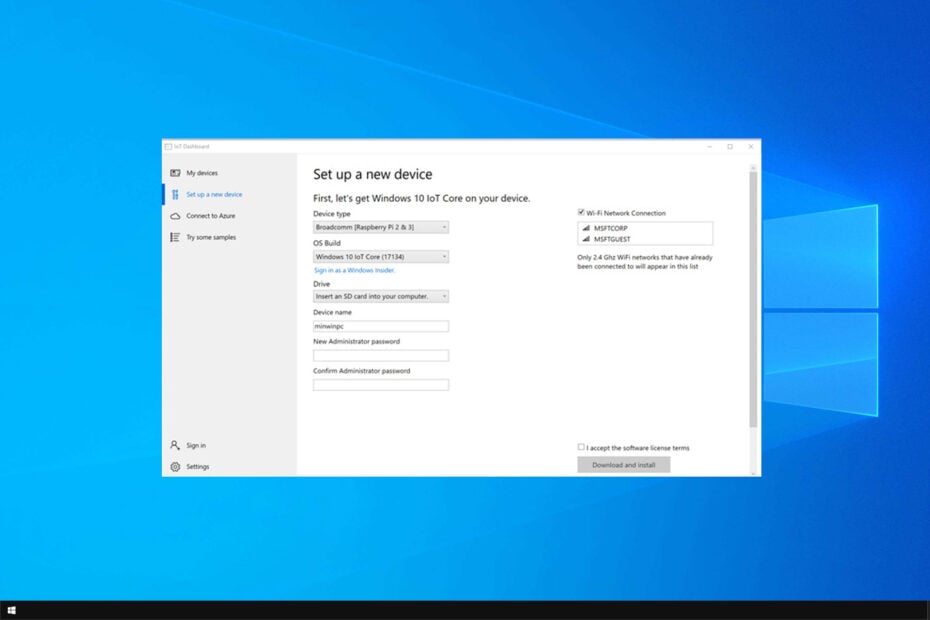
- Install the Windows IoT Core Dashboard on your Windows 10 device.
- Flash the Windows 10 IoT Core operating system onto your Raspberry Pi.
- Enable the Windows IoT Remote Server on your Raspberry Pi by checking the box in the settings.
- Download the Remote Control app for Windows 10 from the Microsoft Store and connect to your Raspberry Pi.
With these steps, you’ll have full control over your Raspberry Pi from anywhere in the world.
Final Thoughts
IoT remote access is a game-changer for anyone looking to enhance their productivity and convenience. Whether you’re managing smart home devices, troubleshooting IoT projects, or monitoring industrial equipment, the ability to control your devices remotely is invaluable. By following the steps outlined in this article, you can set up IoT remote access on Windows 10 for free and enjoy all the benefits it has to offer.
So, what are you waiting for? Dive into the world of IoT remote access and take your tech game to the next level. Trust me, you won’t regret it!