Imagine harnessing the power of a tiny yet mighty device to monitor your system resources remotely with seamless efficiency. The Raspberry Pi, a single-board computer beloved by hobbyists and professionals alike, offers unparalleled flexibility when paired with SSH (Secure Shell) for remote resource monitoring. Whether you're a tech enthusiast, a developer, or simply someone looking to explore the potential of this versatile device, the combination of Raspberry Pi and SSH opens up a world of possibilities. In this in-depth guide, we'll delve into the nuances of setting up, configuring, and optimizing your Raspberry Pi resource monitor using SSH, ensuring you have the tools and knowledge to take control of your system performance like never before.
For many users, the Raspberry Pi serves as a gateway to a variety of projects, from home automation to media centers. However, one of its most powerful applications lies in its ability to function as a robust resource monitor. By leveraging SSH, you can access your Raspberry Pi remotely, monitor its CPU, memory, disk usage, and network activity from anywhere in the world. This capability not only enhances convenience but also empowers users to troubleshoot issues in real-time, ensuring their projects run smoothly without the need for physical access. In this article, we'll explore the steps to set up your Raspberry Pi for remote resource monitoring, discuss essential tools and software, and provide practical tips to optimize performance.
As we embark on this journey, it's important to note that mastering Raspberry Pi resource monitor SSH requires a blend of technical know-how and creativity. Whether you're a seasoned pro or a newcomer to the world of single-board computing, this guide is designed to cater to all levels of expertise. We'll break down complex concepts into digestible chunks, provide hands-on examples, and share insights from real-world applications. By the end of this article, you'll not only understand the mechanics of Raspberry Pi resource monitoring via SSH but also be equipped to implement it in your own projects, paving the way for a more efficient and connected digital experience.
Read also:Sp500 Your Ultimate Guide To The Stock Market Powerhouse
Table of Contents
- 1. Introduction to Raspberry Pi Resource Monitor SSH
- 2. How to Set Up Raspberry Pi Resource Monitor SSH?
- 3. What Tools Are Needed for Raspberry Pi Resource Monitoring?
- 4. Optimization Tips for Raspberry Pi Resource Monitor SSH
- 5. Why Is SSH Ideal for Raspberry Pi Remote Monitoring?
- 6. Common Issues and Troubleshooting with Raspberry Pi SSH
- 7. Real-World Use Cases for Raspberry Pi Resource Monitor SSH
- 8. How Secure Is Your Raspberry Pi Resource Monitor SSH?
- 9. Frequently Asked Questions
- 10. Conclusion: Unlocking the Potential of Raspberry Pi Resource Monitor SSH
Introduction to Raspberry Pi Resource Monitor SSH
The Raspberry Pi, a compact and affordable single-board computer, has revolutionized the world of technology by providing a platform for innovation and experimentation. When paired with SSH (Secure Shell), it transforms into a powerful tool for remote system monitoring. SSH enables users to access their Raspberry Pi from any location, allowing them to monitor critical resources such as CPU usage, memory allocation, disk space, and network activity. This capability is particularly valuable for users managing headless Raspberry Pi setups or those who require remote access for troubleshooting and maintenance.
Understanding the basics of Raspberry Pi resource monitoring via SSH is essential for anyone looking to maximize the potential of this device. At its core, SSH provides a secure communication channel between your local machine and the Raspberry Pi, ensuring that sensitive data remains protected during transmission. By leveraging SSH, users can execute commands, retrieve system metrics, and even automate monitoring tasks using scripts. This level of control is invaluable for developers, hobbyists, and IT professionals alike, as it empowers them to maintain optimal performance and address potential issues proactively.
Furthermore, the integration of SSH with Raspberry Pi resource monitoring introduces a new dimension of flexibility. Users can configure their systems to send alerts when resource thresholds are exceeded, automate backups, or even perform remote reboots. This functionality not only simplifies system management but also enhances productivity by reducing the need for physical intervention. As we explore the intricacies of setting up and utilizing Raspberry Pi resource monitor SSH, we'll uncover the tools, techniques, and best practices that make this combination so effective.
How to Set Up Raspberry Pi Resource Monitor SSH?
Setting up Raspberry Pi resource monitor SSH involves several key steps, each designed to ensure a secure and efficient connection. The process begins with configuring your Raspberry Pi to enable SSH, followed by establishing a network connection and installing necessary monitoring tools. Let's break down this process into manageable segments to guide you through the setup:
Enabling SSH on Raspberry Pi
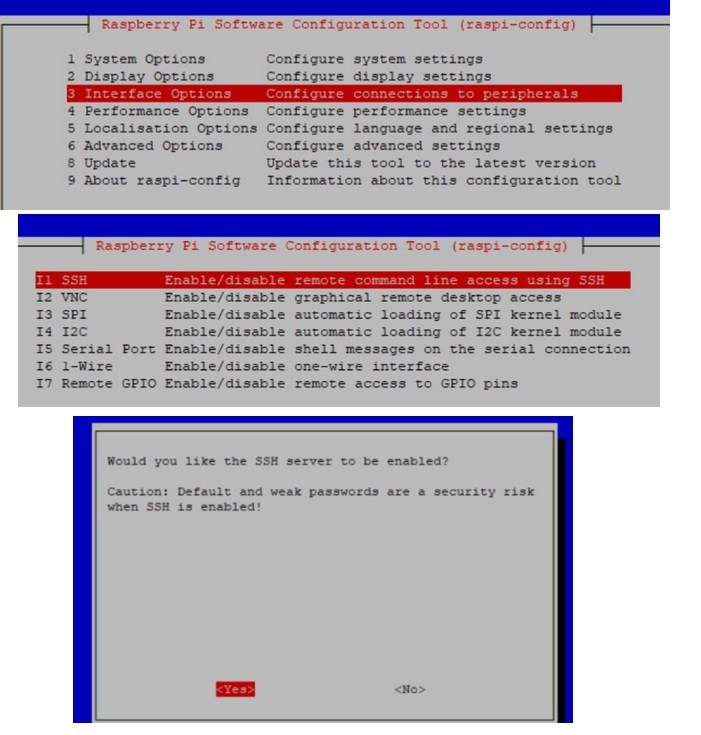
To enable SSH on your Raspberry Pi, you'll need to access the device's configuration settings. On newer versions of Raspberry Pi OS, SSH is disabled by default for security reasons. To activate it, navigate to the Raspberry Pi Configuration tool by opening the terminal and typing:
sudo raspi-config
Read also:Mehdi Hasan Wife A Closer Look At The Life And Love Of A Renowned Journalist
From the menu, select "Interfacing Options" and enable SSH. Alternatively, you can enable SSH by creating an empty file named "ssh" on the boot partition of your SD card before powering on the Raspberry Pi. Once enabled, SSH will allow you to connect to your Raspberry Pi remotely using a client like PuTTY (for Windows) or the built-in terminal on macOS and Linux.
Establishing a Network Connection
A stable network connection is crucial for SSH to function effectively. Ensure your Raspberry Pi is connected to your local network via Ethernet or Wi-Fi. You can check your IP address by running:
hostname -I
This command will display the IP address assigned to your Raspberry Pi, which you'll need to connect via SSH from another device. If you're using a headless setup (no monitor or keyboard), consider using a tool like Advanced IP Scanner to locate your Raspberry Pi on the network.
Installing Monitoring Tools
Once SSH is enabled and your network connection is established, the next step is to install monitoring tools on your Raspberry Pi. Popular options include:
- htop: A powerful interactive process viewer that provides real-time monitoring of CPU, memory, and disk usage.
- glances: A cross-platform monitoring tool that offers a comprehensive overview of system resources.
- dstat: A versatile tool that combines the functionalities of vmstat, iostat, netstat, and ifstat.
Install these tools using the following commands:
sudo apt update
sudo apt install htop glances dstat
With these tools in place, you can now access your Raspberry Pi resource monitor SSH and begin monitoring your system's performance remotely.
What Tools Are Needed for Raspberry Pi Resource Monitoring?
Effective Raspberry Pi resource monitoring requires a combination of software tools and hardware components. While the Raspberry Pi itself serves as the foundation, additional tools enhance its monitoring capabilities and streamline the process. Below, we explore the essential tools needed for successful Raspberry Pi resource monitoring via SSH:
Software Tools
Software tools play a pivotal role in enabling comprehensive resource monitoring. Here are some of the most widely used tools:
- htop: As mentioned earlier, htop provides an intuitive interface for monitoring CPU, memory, and disk usage in real-time.
- glances: This tool offers a more detailed view of system resources, including network activity, disk I/O, and temperature.
- dstat: Ideal for generating reports and analyzing trends over time, dstat is a must-have for advanced users.
- sysstat: A collection of performance monitoring tools that includes iostat, mpstat, and sar, providing historical data for system analysis.
Installing these tools is straightforward using the package manager:
sudo apt install sysstat
Hardware Components
While the Raspberry Pi is the primary hardware component, additional peripherals can enhance monitoring capabilities:
- SD Card: A reliable storage medium is essential for storing monitoring data and logs.
- Power Supply: A stable power source ensures uninterrupted monitoring.
- Network Adapter: For wireless setups, a high-quality Wi-Fi adapter can improve connectivity and reliability.
By combining these software and hardware tools, users can create a robust Raspberry Pi resource monitoring setup tailored to their specific needs.
Optimization Tips for Raspberry Pi Resource Monitor SSH
Optimizing your Raspberry Pi resource monitor SSH setup can significantly enhance performance and efficiency. Below, we explore practical tips to help you get the most out of your system:
Optimize Network Configuration
Ensuring a stable and fast network connection is critical for seamless SSH monitoring. Consider the following:
- Use a wired Ethernet connection whenever possible for better speed and reliability.
- Configure your router to assign a static IP address to your Raspberry Pi, preventing IP conflicts.
- Enable Quality of Service (QoS) settings on your router to prioritize SSH traffic.
Automate Monitoring Tasks
Automation simplifies the monitoring process and reduces manual intervention. Use tools like cron to schedule regular checks and alerts:
crontab -e
Add the following line to check disk usage every hour:
0 * * * * df -h > /tmp/disk_usage.log
Monitor Resource Usage Efficiently
Efficient resource monitoring minimizes system overhead and ensures optimal performance. Use lightweight tools like dstat for periodic checks and configure alerts for critical thresholds:
- Set up email notifications using tools like sSMTP to receive alerts when resources exceed predefined limits.
- Utilize logging tools like rsyslog to capture and analyze monitoring data over time.
By implementing these optimization tips, users can create a more efficient and reliable Raspberry Pi resource monitoring setup.
Why Is SSH Ideal for Raspberry Pi Remote Monitoring?
SSH (Secure Shell) stands out as the ideal protocol for Raspberry Pi remote monitoring due to its robust security features and ease of use. Unlike other protocols, SSH encrypts all data transmitted between your local machine and the Raspberry Pi, ensuring that sensitive information remains protected from unauthorized access. Additionally, SSH supports public key authentication, eliminating the need for passwords and enhancing security further.
Another advantage of SSH is its versatility. Users can execute a wide range of commands remotely, from checking system metrics to performing software updates. This capability is particularly valuable for managing headless Raspberry Pi setups, where physical access is limited or impractical. Moreover, SSH integrates seamlessly with various monitoring tools, enabling users to retrieve detailed reports and perform real-time analysis.
Finally, SSH's cross-platform compatibility makes it accessible to users on Windows, macOS, and Linux systems alike. With the right client software, users can connect to their Raspberry Pi from virtually any device, providing unparalleled flexibility and convenience.
Common Issues and Troubleshooting with Raspberry Pi SSH
Despite its many advantages, SSH can sometimes present challenges when used for Raspberry Pi resource monitoring. Below, we address common issues and provide practical solutions:
Connection Refused Errors
One of the most frequent issues users encounter is the "Connection refused" error. This typically occurs when SSH is not enabled or the Raspberry Pi's IP address has changed. To resolve this:
- Ensure SSH is enabled using the Raspberry Pi Configuration tool.
- Verify the IP address by running
hostname -Iand update your SSH client accordingly.
Authentication Failures
Authentication failures often result from incorrect credentials or misconfigured SSH settings. To address this:
- Double-check your username and password for accuracy.
- Ensure public key authentication is properly configured if using key-based access.
By addressing these common issues, users can troubleshoot and resolve problems quickly, ensuring a smooth SSH experience.
Real-World Use Cases for Raspberry Pi Resource Monitor SSH
Raspberry Pi resource monitor SSH finds applications in a variety of real-world scenarios, from home automation to professional IT environments. Below, we explore some of the most compelling use cases:
Home Automation