Imagine being able to access your Raspberry Pi remotely from anywhere in the world, even when it's tucked safely behind your router, all while using a Windows 10 machine. This is not just a pipe dream but a reality that thousands of tech enthusiasts have already embraced. The ability to control your Raspberry Pi remotely opens up endless possibilities, from monitoring home security systems to managing servers or automating household tasks. However, setting up remote SSH for your Raspberry Pi, especially when it's behind a router, can seem daunting to beginners. But don't worry! With this detailed guide, you'll learn step-by-step how to configure everything seamlessly.
Remote SSH Raspberry Pi behind router Windows 10 is a powerful tool that allows you to execute commands and manage files on your Raspberry Pi from a distance. Whether you're a seasoned developer or a curious hobbyist, understanding how this setup works can significantly enhance your productivity. By the end of this article, you'll not only know how to set it up but also troubleshoot common issues and optimize your connection for speed and security.
This guide dives deep into the world of remote SSH configurations, offering practical tips, troubleshooting advice, and advanced techniques. You'll learn how to configure your router, set up SSH on your Raspberry Pi, and connect securely from your Windows 10 machine. We'll also explore some of the common pitfalls and how to avoid them, ensuring your setup is as smooth as possible. So, whether you're looking to automate tasks or simply want remote access to your device, this article has everything you need to succeed.
Read also:Unpacking The Complex World Of Tariffs A Deep Dive Into Their Impact And Importance
Table of Contents
- 1. Why Should You Use Remote SSH Raspberry Pi Behind Router Windows 10?
- 2. What Are the Prerequisites for Setting Up Remote SSH?
- 3. How Do You Configure SSH on Your Raspberry Pi?
- 4. Configuring Your Router for Remote Access
- 5. Connecting from Windows 10: A Step-by-Step Guide
- 6. Is Remote SSH Secure? Tips for Enhancing Security
- 7. Troubleshooting Common Issues with Remote SSH
- 8. Advanced Techniques for Optimizing Remote SSH
Why Should You Use Remote SSH Raspberry Pi Behind Router Windows 10?
In today’s interconnected world, the ability to remotely control devices is increasingly important. Remote SSH Raspberry Pi behind router Windows 10 offers several advantages that make it an essential tool for anyone working with Raspberry Pi. First and foremost, it allows you to access your Raspberry Pi without being physically present, which is particularly useful if your device is located in a different room or even in another country. This setup can save you time and effort, especially if you frequently need to check on or modify your device.
Another significant benefit is the flexibility it provides. With remote SSH, you can execute commands, transfer files, and manage your Raspberry Pi’s settings from the comfort of your Windows 10 machine. This capability is invaluable for automating tasks, such as running scripts or monitoring system logs, which can help streamline your workflow. Additionally, SSH offers a secure way to connect to your Raspberry Pi, encrypting all communication between your computer and the device, thus safeguarding sensitive data.
Finally, using remote SSH Raspberry Pi behind router Windows 10 can enhance your learning experience. By experimenting with different configurations and settings, you can deepen your understanding of networking, security, and device management. This hands-on approach not only boosts your technical skills but also equips you with the knowledge to tackle more complex projects in the future. In short, mastering this setup can open doors to a wide range of possibilities, making it a valuable skill to have in your toolkit.
What Are the Prerequisites for Setting Up Remote SSH?
Before diving into the setup process, it's crucial to ensure that you have all the necessary prerequisites in place. To begin with, you'll need a Raspberry Pi with an operating system installed, preferably Raspbian, which comes with SSH enabled by default. Additionally, your Raspberry Pi should be connected to the internet via a stable and reliable connection, either through Wi-Fi or Ethernet. This ensures that your device can communicate with the outside world.
On the Windows 10 side, you'll need an SSH client to establish a connection with your Raspberry Pi. While Windows 10 now includes an SSH client as part of its features, you may also consider using third-party tools like PuTTY or MobaXterm for more advanced functionality. These tools offer additional features such as graphical file transfers and terminal emulators, which can enhance your remote SSH experience. Furthermore, having a basic understanding of networking concepts, such as IP addresses and port forwarding, will be beneficial as you configure your router for remote access.
Lastly, it's important to note that security should be a top priority when setting up remote SSH. This involves creating strong passwords, disabling root login, and considering the use of SSH keys for authentication. By taking these precautions, you can significantly reduce the risk of unauthorized access to your Raspberry Pi, ensuring that your data remains safe and secure. With all these prerequisites in place, you're ready to proceed with the setup process.
Read also:Jarrod And Brandi The Power Couple Everyonersquos Talking About
How Do You Configure SSH on Your Raspberry Pi?
Configuring SSH on your Raspberry Pi is a straightforward process that involves enabling the SSH service and setting up basic security measures. Start by booting up your Raspberry Pi and logging into the command line interface. Once logged in, you can enable SSH by running the following command: sudo raspi-config. This will launch the Raspberry Pi configuration tool, where you can navigate to the "Interfacing Options" menu and select "SSH". From there, choose to enable SSH and exit the configuration tool.
Next, it's essential to set a secure password for your Raspberry Pi. You can do this by running the command sudo passwd pi, which will prompt you to enter and confirm a new password. Make sure to choose a strong, unique password that includes a mix of uppercase and lowercase letters, numbers, and special characters. Additionally, consider disabling the default "pi" user account and creating a new user with limited privileges to further enhance security.
Finally, you may want to configure SSH keys for authentication instead of relying solely on passwords. This involves generating a key pair on your Windows 10 machine and copying the public key to your Raspberry Pi. To generate a key pair, use a tool like PuTTYgen, and then copy the public key to your Raspberry Pi by running the command ssh-copy-id username@raspberrypi. Once configured, SSH keys provide a more secure and convenient way to authenticate your connections, reducing the risk of brute-force attacks.
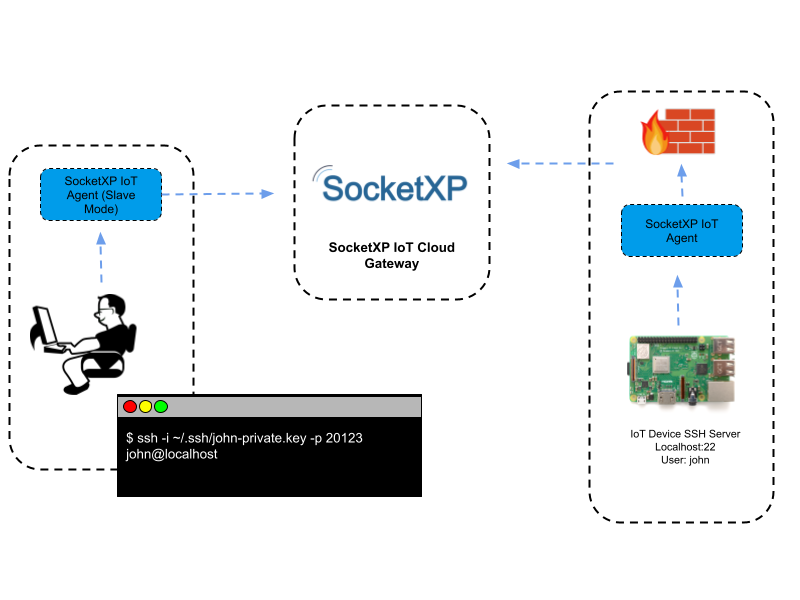
Configuring Your Router for Remote Access
One of the critical steps in setting up remote SSH Raspberry Pi behind router Windows 10 is configuring your router to allow external access. This process typically involves port forwarding, which directs incoming traffic on a specific port to your Raspberry Pi's local IP address. To begin, log into your router's admin interface by entering its IP address into a web browser, usually something like 192.168.0.1 or 192.168.1.1. You'll need the router's username and password, which can often be found on a sticker attached to the router or in the user manual.
Once logged in, navigate to the port forwarding section, which may be labeled differently depending on your router model, such as "virtual servers" or "application sharing". Here, you'll need to create a new rule specifying the port number (usually 22 for SSH), the protocol (TCP), and the local IP address of your Raspberry Pi. Be sure to save your changes and restart the router if necessary to apply the new settings. It's also a good idea to assign a static IP address to your Raspberry Pi to prevent it from changing during reboots, which could disrupt the port forwarding setup.
Connecting from Windows 10: A Step-by-Step Guide
With your Raspberry Pi and router configured, it's time to connect from your Windows 10 machine. Begin by opening the Command Prompt or PowerShell and typing the command ssh username@your_raspberry_pi_ip, replacing "username" with the actual username on your Raspberry Pi and "your_raspberry_pi_ip" with its public IP address. If you're using a third-party SSH client like PuTTY, you can enter the IP address and port number in the respective fields and click "Open" to establish the connection.
Upon connecting, you'll be prompted to accept the server's host key and enter your password or use SSH keys for authentication. Once authenticated, you'll have full access to your Raspberry Pi's command line interface, allowing you to execute commands, manage files, and perform various tasks remotely. Remember to log out properly after finishing your session by typing exit to ensure the connection is closed securely.
Is Remote SSH Secure? Tips for Enhancing Security
While remote SSH offers a secure way to connect to your Raspberry Pi, there are additional steps you can take to enhance its security. One of the most effective methods is to change the default SSH port from 22 to a higher, less commonly used port, such as 2222. This simple change can deter automated attacks that target the default port. To modify the port, edit the SSH configuration file by running sudo nano /etc/ssh/sshd_config, find the line that says "Port 22", and change it to your desired port number. Don't forget to update your router's port forwarding settings accordingly.
Another crucial step is to disable password authentication and rely solely on SSH keys for access. This can be done by editing the same SSH configuration file and setting the "PasswordAuthentication" option to "no". Additionally, consider limiting access to specific IP addresses by adding firewall rules or using tools like fail2ban to automatically block repeated login attempts from suspicious sources. By implementing these measures, you can significantly enhance the security of your remote SSH setup.
How Can You Troubleshoot Common Issues with Remote SSH?
Even with careful planning and setup, issues can arise when using remote SSH Raspberry Pi behind router Windows 10. One common problem is being unable to establish a connection, which could be due to incorrect IP addresses, misconfigured port forwarding, or firewall settings blocking the connection. To troubleshoot, start by verifying that your Raspberry Pi's IP address is correct and that your router's port forwarding rules are properly set up. You can also try temporarily disabling any firewalls or antivirus software on your Windows 10 machine to see if they're interfering with the connection.
Another issue you might encounter is slow connection speeds or frequent disconnections. This could be caused by network congestion, unstable internet connections, or insufficient bandwidth. To address this, consider optimizing your network settings, such as adjusting the MTU size or enabling QoS (Quality of Service) on your router to prioritize SSH traffic. Additionally, using a wired Ethernet connection instead of Wi-Fi can improve stability and reduce latency.
If you're still experiencing problems, don't hesitate to consult the logs for more information. On your Raspberry Pi, you can view SSH logs by running the command sudo journalctl -u ssh, which will display any errors or warnings related to the SSH service. Similarly, checking your router's logs can help identify issues with port forwarding or incoming connections. By systematically addressing these potential problems, you can resolve most issues and ensure a smooth remote SSH experience.
What Are Some Advanced Techniques for Optimizing Remote SSH?
Once you've mastered the basics of remote SSH Raspberry Pi behind router Windows 10, you can explore advanced techniques to further optimize your setup. One such technique is compressing data during transmission, which can significantly reduce the time it takes to transfer large files or execute commands over slow connections. To enable compression, add the "-C" option to your SSH command, like so: ssh -C username@your_raspberry_pi_ip. This will compress the data before sending it, decompressing it on the receiving end.
Another advanced feature is tunneling, which allows you to securely forward traffic from one network to another. For example, you could use SSH tunneling to access a web server running on your Raspberry Pi from your Windows 10 machine, bypassing any firewalls or restrictions. To set up a tunnel, use the "-L" option followed by the local port, remote host, and remote port, such as ssh -L 8080:localhost:80 username@your_raspberry_pi_ip. This command forwards traffic from port 8080 on your local machine to port 80 on your Raspberry Pi.
Finally, consider automating repetitive tasks using SSH scripts or tools like Ansible or Fabric. These tools allow you to define and execute complex workflows, such as deploying software updates or configuring multiple devices, with minimal effort. By leveraging these advanced techniques, you can streamline your workflow and make the most of your remote SSH setup.
FAQs
What Is the Best SSH Client for Windows 10?
While Windows 10 includes a built-in SSH client, many users prefer third-party tools like PuTTY or MobaXterm for their additional features and ease of use. PuTTY is a lightweight, open-source client that offers advanced options like SSH key management and port forwarding, making it a popular choice among developers. MobaXterm, on the other hand, provides a comprehensive suite of tools, including a terminal emulator, file manager,