Hey there, tech enthusiasts! If you're reading this, chances are you're diving into the world of remote access and exploring ways to control your IoT devices from afar. Well, buckle up because today we're diving deep into the realm of RemoteIoT Web SSH Server on Windows 10. It's like having a superpower that lets you manage your devices without being physically present. Whether you're a developer, a hobbyist, or just someone curious about tech, this is the ultimate guide to setting up and mastering remote IoT connections using SSH. Let's get started!
Now, you might be wondering, "What exactly is RemoteIoT Web SSH Server?" It's basically a tool that allows you to establish secure connections between your devices and your Windows 10 machine. Think of it as a digital bridge that lets you send commands, transfer files, and manage settings—all from the comfort of your laptop or desktop. This isn't just any ordinary tool; it's a game-changer for anyone working with IoT devices. The best part? It’s incredibly secure, thanks to SSH encryption. So, whether you're monitoring sensors, controlling smart home devices, or managing remote servers, this setup has got you covered.
Before we dive deeper, let's talk about why this setup is so important. In today's connected world, having remote access to your IoT devices isn't just a luxury—it's a necessity. Whether you're troubleshooting from across the globe or simply want to check in on your smart home setup while you're at work, RemoteIoT Web SSH Server makes it possible. Plus, with more people working remotely, the demand for secure and efficient remote access solutions has skyrocketed. This guide will walk you through everything you need to know, step by step, so you can harness the full potential of this powerful tool. Ready to dive in?
Read also:Leo Wu And Kris Wu Relationship A Closer Look At The Brothersrsquo Bond
Table of Contents:
- What is RemoteIoT Web SSH Server?
- Why Choose Windows 10 for RemoteIoT?
- Prerequisites for Setup
- Installation Process
- Configuring SSH on Windows 10
- Securing Your Connection
- Troubleshooting Tips
- Advanced Features and Customizations
- Real-World Use Cases
- Conclusion and Next Steps
What is RemoteIoT Web SSH Server?
Alright, let's break it down. RemoteIoT Web SSH Server is essentially a software solution that enables you to remotely access and manage IoT devices via SSH (Secure Shell). SSH is a cryptographic protocol that provides a secure way to access remote systems over an unsecured network. It’s like a secret tunnel that keeps your data safe while you’re interacting with your devices from afar.
Now, why is this important? Well, IoT devices are everywhere these days—smart thermostats, security cameras, drones, you name it. But managing these devices can be tricky, especially if you’re not physically near them. That’s where RemoteIoT Web SSH Server comes in. It allows you to send commands, check logs, and even update firmware—all without leaving your desk. Plus, it’s super secure, which is crucial in today’s data-driven world.
And here’s the kicker: it’s not just for tech pros. Even if you’re new to the world of IoT, this setup is surprisingly user-friendly once you get the hang of it. So whether you’re a seasoned developer or just starting out, this is a tool worth exploring.
Why Choose Windows 10 for RemoteIoT?
When it comes to remote access, Windows 10 is a top contender for a few key reasons. First off, it’s one of the most widely used operating systems out there, which means there’s tons of support and resources available if you run into any issues. Plus, Windows 10 has built-in SSH functionality, making it super easy to set up without needing to install third-party software.
Another big advantage is compatibility. Windows 10 works seamlessly with a wide range of IoT devices, so you don’t have to worry about driver issues or compatibility problems. And let’s not forget the security features. Windows 10 comes with advanced encryption protocols and firewall settings that help keep your connections secure.
Read also:3874512363123943876121629653062366530000334572337612398251042115129289354861239212381123983103820250303402443338911
But wait, there’s more! Windows 10 also offers a user-friendly interface, making it accessible even for beginners. So whether you’re a tech wizard or just dipping your toes into the world of IoT, Windows 10 is a solid choice for setting up your RemoteIoT Web SSH Server.
Prerequisites for Setup
Before you dive into the setup process, there are a few things you’ll need to have in place:
- A Windows 10 machine: This can be a laptop, desktop, or even a virtual machine.
- An IoT device: Whether it’s a Raspberry Pi, an Arduino, or any other smart device, make sure it’s connected to the same network as your Windows 10 machine.
- An active internet connection: This is crucial for establishing a remote connection.
- Basic knowledge of SSH: Don’t worry if you’re new to this; we’ll cover the basics later on.
- Administrative privileges: You’ll need admin access to install and configure the necessary settings on your Windows 10 machine.
Once you’ve got all these ducks in a row, you’re ready to move on to the next step. Trust me, it’s not as complicated as it sounds. Let’s keep rolling!
Installation Process
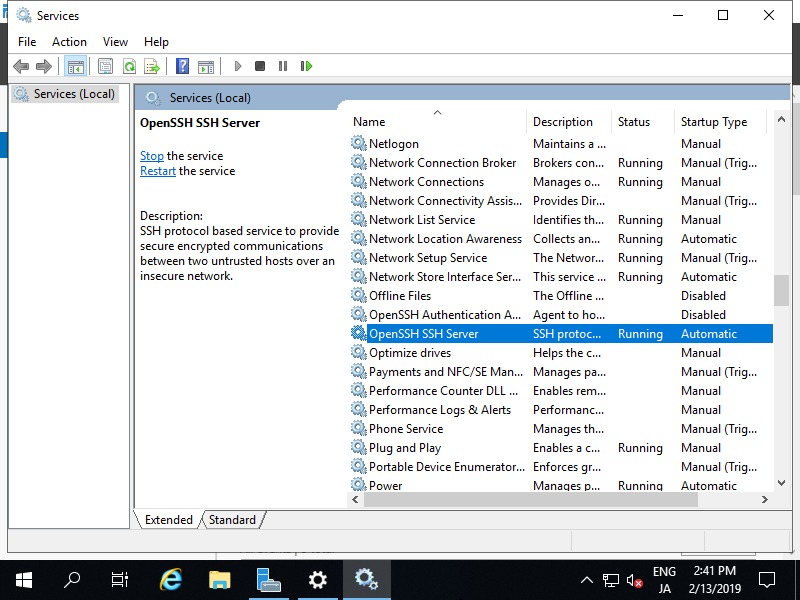
Step 1: Enabling SSH on Windows 10
The first thing you’ll need to do is enable SSH on your Windows 10 machine. Here’s how:
- Open the Start menu and type "Turn Windows features on or off."
- Scroll down and check the box next to "OpenSSH Server."
- Click "OK" and restart your computer if prompted.
That’s it! You’ve now enabled SSH on your Windows 10 machine. Easy peasy, right?
Step 2: Installing RemoteIoT Web SSH Server
Next up, you’ll need to install the RemoteIoT Web SSH Server software. There are a few options out there, but for this guide, we’ll focus on the most popular and reliable ones. Here’s a quick rundown:
- Option 1: Using a Pre-Built Package: Some manufacturers offer pre-built packages specifically designed for Windows 10. These are usually plug-and-play, so you won’t need to mess around with complex configurations.
- Option 2: Manual Installation: If you prefer a more hands-on approach, you can download the source code and compile it yourself. This gives you more control over the setup but requires a bit more technical know-how.
Regardless of which option you choose, make sure to follow the installation instructions carefully. Trust me, it’ll save you a lot of headaches down the line.
Configuring SSH on Windows 10
Now that you’ve installed the necessary software, it’s time to configure SSH. This is where the magic happens. Here’s a step-by-step guide to help you set everything up:
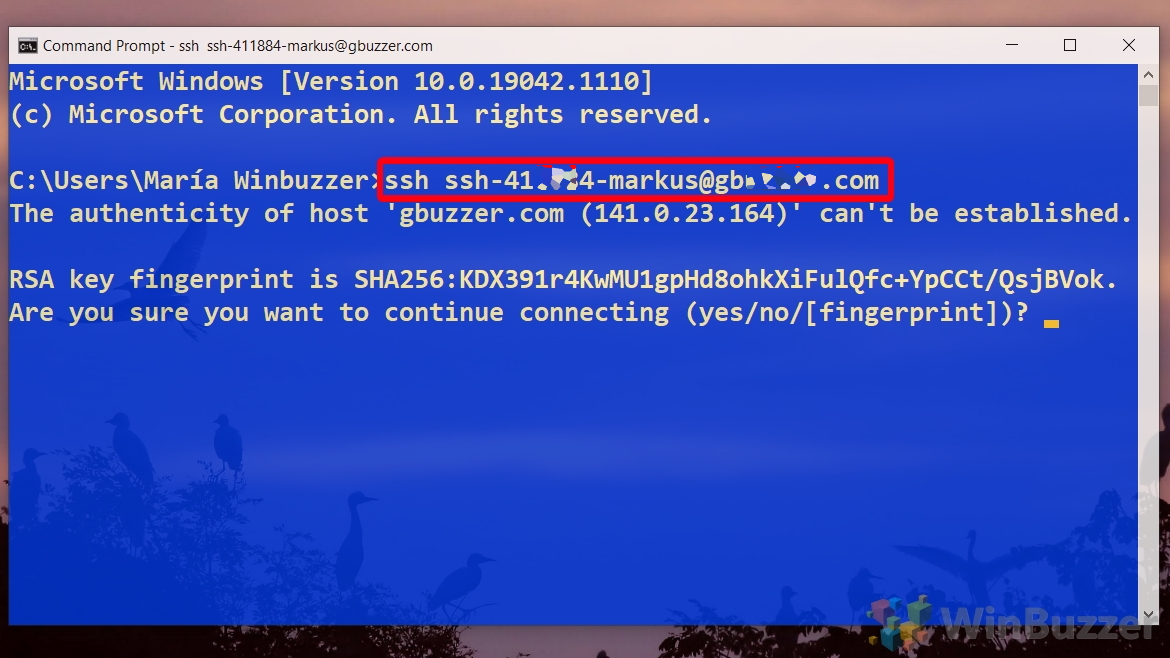
- Open the Command Prompt as an administrator.
- Type "ssh localhost" and hit Enter to test the connection.
- If everything is working correctly, you should see a message indicating that the SSH service is running.
- Next, you’ll want to configure the SSH settings. This includes setting up usernames, passwords, and other security parameters.
Pro tip: Make sure to use strong, unique passwords to keep your connection secure. And don’t forget to enable two-factor authentication if your software supports it.
Securing Your Connection
Security is key when it comes to remote access. Here are a few tips to help you keep your connection safe:
- Use Strong Passwords: Avoid using common passwords or ones that are easy to guess. Mix it up with letters, numbers, and symbols.
- Enable Firewall Rules: Configure your Windows 10 firewall to only allow SSH traffic from trusted IP addresses.
- Update Regularly: Keep your software and operating system up to date to protect against vulnerabilities.
- Monitor Logs: Regularly check your SSH logs for any suspicious activity.
By following these best practices, you’ll significantly reduce the risk of unauthorized access and keep your IoT devices safe.
Troubleshooting Tips
Even the best-laid plans can hit a snag. If you run into issues during the setup process, here are a few troubleshooting tips to help you out:
- Check Your Network Connection: Make sure both your Windows 10 machine and IoT device are connected to the same network.
- Verify SSH Service Status: Use the Command Prompt to check if the SSH service is running properly.
- Review Firewall Settings: Ensure that your firewall isn’t blocking SSH traffic.
- Consult Documentation: If all else fails, refer to the official documentation for your specific software.
Remember, troubleshooting is all about patience and persistence. Keep at it, and you’ll get it working in no time.
Advanced Features and Customizations
Once you’ve got the basics down, it’s time to explore some advanced features. Here are a few ideas to take your RemoteIoT Web SSH Server setup to the next level:
- Automate Tasks: Use scripts to automate repetitive tasks, like sending commands or updating firmware.
- Set Up Alerts: Configure your system to send alerts if certain conditions are met, such as temperature thresholds or motion detection.
- Integrate with Other Tools: Combine your setup with other software solutions, like home automation platforms or cloud services.
The possibilities are endless, so don’t be afraid to experiment and see what works best for your needs.
Real-World Use Cases
To give you a better idea of how RemoteIoT Web SSH Server can be used, here are a few real-world examples:
- Smart Home Automation: Control your smart home devices from anywhere in the world.
- Remote Monitoring: Keep an eye on your IoT devices and receive alerts if anything goes wrong.
- Industrial IoT: Manage industrial equipment and sensors remotely, improving efficiency and reducing downtime.
These are just a few examples, but the applications are virtually limitless. Whether you’re a homeowner, a business owner, or a tech enthusiast, RemoteIoT Web SSH Server has something to offer.
Conclusion and Next Steps
And there you have it—the ultimate guide to setting up and mastering RemoteIoT Web SSH Server on Windows 10. From enabling SSH to configuring advanced features, we’ve covered everything you need to know to take full control of your IoT devices. But remember, this is just the beginning. The world of IoT is constantly evolving, and there’s always something new to learn.
So, what’s next? Here are a few suggestions:
- Experiment with New Features: Try out some of the advanced features we discussed and see how they can enhance your setup.
- Stay Updated: Keep an eye on the latest developments in the IoT space and incorporate new tools and technologies into your workflow.